
The blog face lift is starting to come together. I'm excited that my social media buttons are working now! I've been busy doing really boring stuff like moving old blog posts into a new file. Though it is completely boring, I'm excited to have a nice clean start! So as my eyes were crossing from data entry, I decided to do something fun.
As much as I would love to be showing you pictures of the mudroom, we've had a couple of setbacks with the cold weather. I need to paint the doors with stinky enamel paint which requires us to open the windows. We need to tile the floor, which requires us to open the door to the garage. So unless we want to freeze to death, it's just not happening! Hope to get back in there soon, come on warm weather!
So I'm taking a little detour from the mudroom to the boys room. And it's been a fun trip so far! I feel like there is so much freedom for creativity in kids rooms. You can literally do anything from ceiling to floor. I like making my boys room nice and put together, but with touches of fun and pure adolescence!
I needed one more picture for their gallery wall I'm putting together. I found a print with a cute definition of a BOY. I really wanted something bright and electric. The print was printed in red, but I wanted it to be neon....to give it a unexpected pop of color! Knowing my printer couldn't print that bright of a color, I decided to cut the letters out with bright green card stock........
Here's how I made the print:

1. On my computer I went Microsoft Word and set up an 8 1/2 X 11 document. Typed in BOY on one page. Then type in the definition on another page: 1. a noise with dirt on it.
I made the BOY really big and the definition medium sized and placed it low on the page. Use card stock if you have it. NOTE: Regular paper works fine and the wrinkles will iron out when you put it in a frame.
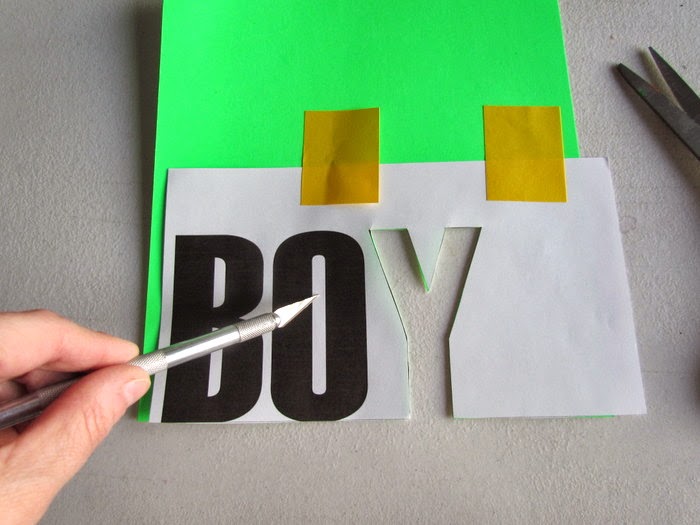
2. Then I took the bright green paper and Trimmed a little under 3/4 of an inch off of each side. And then I trimmed 2 inches off the bottom of the paper. Keep the 3/4 inch strip to put on the bottom of the print.

3. Then I drew a line with a straight edge along the bottom of the letters. Then cut the line.

4. Lined up the BOY letters on the bottom of the green paper, leaving a little space on the left hand side (about 3/4 inch space) Then I tacked them with postits so that the paper wouldn't slip or rip.

5. Cut the letters out. I cut the Y out with scissors.

And the inside of the B and O with and x-acto knife.
Keep the insides of the B and O and set aside.

I finished cutting the B and O with scissors...

6.Tape the back of the Green paper.....

and place and center it right above the definition.

7. Glue your B and O insides with a glue stick....

Glue your strip along the bottom.

8. Tape the back of the whole print...


and frame it!

So glad I decided to make this print. It was so fun to do something creative on the computer instead of organizing files! I love electric touch it gives in the boys room. I spent a $1 on this project for the frame at the dollar store.

What is the craziest thing you done in your kids room?


No comments :
Post a Comment